Mailsend Lite Printing Support
Issue
Your device will display a message when you’re out of ink, and you will not be able to print postage until you replace the ink cartridge. You can order replacement ink cartridges from our online store.
Solution: Replace The Ink Cartridge
Watch this video to learn how to replace the ink cartridge for the franking machine.
Once you have purchased your brand new ink cartridge from Mailcoms, follow the instructions below to change your ink cartridge:
1. Tap “Settings”.
2. Tap “Ink Functions”.
3. Tap “Replace Ink”.
4. Make sure you have the new ink cartridge ready to be installed, then tap “Yes”.
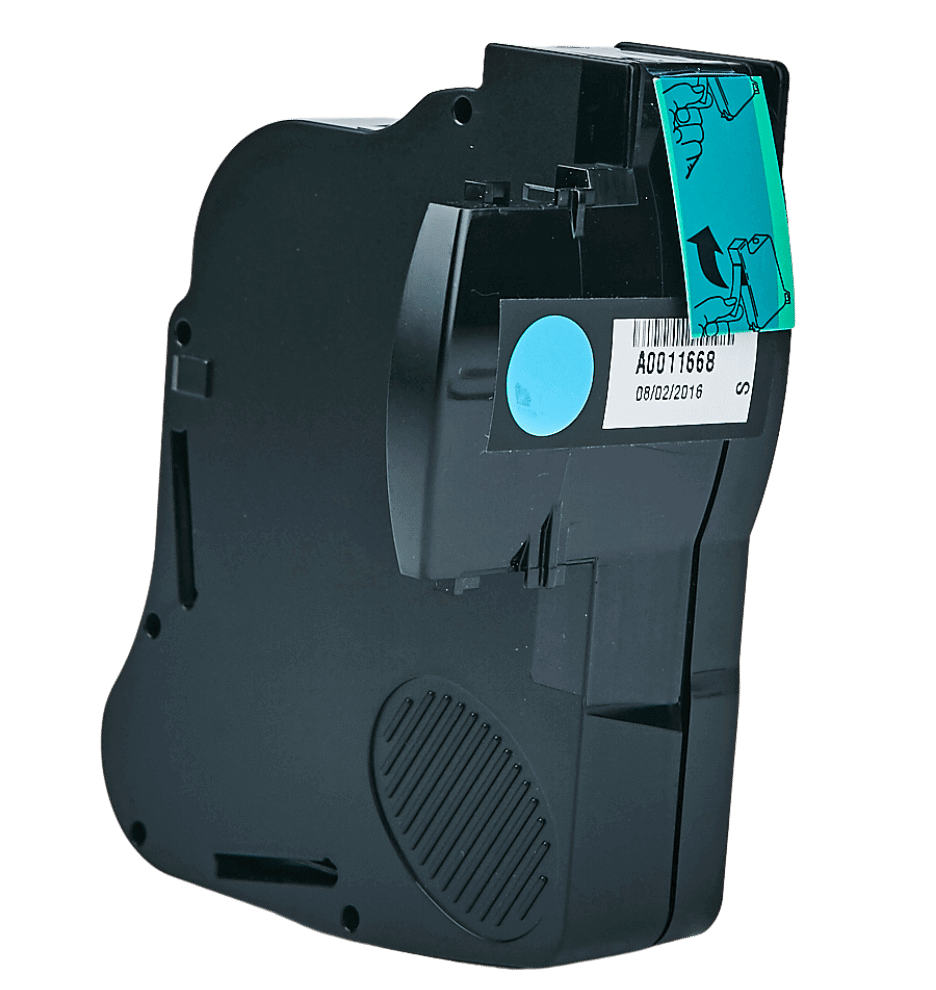
5. Lift the ink door by pulling up on the tab.
6. Remove the ink cartridge.
Caution: Do not touch the metal parts; they may be hot. Do not shake the ink cartridge; this may cause ink to spill.
a. Push the cartridge downward towards the table until you hear a click
b. Pull the ink cartridge out from the device.
7. Remove the shipping tape from the new ink cartridge.
8. Insert the ink cartridge into the device with the label facing you.
9. Push the ink cartridge into the slot until it clicks.
10. Close the cover and follow the prompts on the screen.
Issue
The device does not print well or at all.Cause
There is a problem with the ink cartridge or the print nozzles need cleaning.Solution 1: Check the ink cartridge
1. Make sure you install a Mailcoms Royal Mail Approved ink cartridge. 2. If you need ink, order a Mailcoms Royal Mail Approved replacement ink cartridge from us today.Solution 2: Run a test pattern and clean print nozzles
Watch this video to learn how to clean the print nozzles on the franking machine.
Or follow these instructions:
1. On your screen, press the Settings Cog icon.
2. Select “Ink Functions”.
3. Select “Clean Ink Nozzles”. The machine will then start the cleaning process.
4. After soon time, the process will be complete. Select “Done”.
5. We now need to perform a test print. Select “Create Test Print”.
6. Insert a single franking label. The machine will now produce a test print.
Watch this video to learn how to perform a test print on the franking machine.
Or follow these instructions:
1. On your screen, press the Settings Cog icon.
2. Select “Ink Functions”.
3. Select “Create Test Print”.
4. Insert a single franking label. The machine will now produce a test print.
If you do not have enough postage on an envelope, you can add more postage to your mail piece. This is called a surcharge payment. Additional postage may be printed directly on the opposite corner of the envelope or printed onto a tape which is then applied to the mail piece. A Surcharge Payment allows you to print a custom postage amount on your franking machine. You can enter any value from £0.00 up to £999.99.
1. (Optional) If accounting is enabled, tap “Cost Account” to select an account, or leave the default account selected.
2. Tap the arrows at the top of the display to scroll and tap “Custom Job”.
3. Tap the down arrow to scroll and tap “Surcharge”.
4. Enter the custom amount and tap “Apply”.
5. Insert the envelope or tape into the device, pushing in all the way to the back and right. The device will clamp the mail piece and print postage. The power button will flash while the device is printing.
1. Place your envelope on the scale or enter the weight manually.
2. (Optional) If accounting is enabled, tap “Cost Account” to select an account, or leave the default account selected.
3. Ensure that the correct class and envelope size are selected by tapping the arrows at the top of the display.
4. Insert the letter into the device, pushing in all the way to the back and right. The device will clamp the letter and print postage. The power button will flash while the device is printing.
5. When the device finishes printing, remove the letter. Do not pull the letter out of the machine while the power button is flashing.
Use the Print Date & Time feature to timestamp incoming mail.
1. Tap “Settings”.
2. Tap the right arrow to advance to page 2.
3. Tap “Print Date & Time”.
4. Tap “Print Date & Time”.
5. Insert the letter into the device, pushing in all the way to the back and right. The device will clamp the letter and print the date and time. The power button will flash while the device is printing.
If you already printed today’s date and postage on an envelope, but you missed your mail pickup, you can re-date the mail. You must print a future date on the back of the envelope before you can mail it.
1. Tap “Settings”.
2. Tap “Date Settings”.
3. Tap Correct Date with zero value print.
4. Tap Select Date to Print.
5. Tap on the date you want to use, then tap Apply.
6. Turn the envelope over to the blank side.
7. Insert the letter into the device, pushing in all the way to the back and right. The device will clamp the letter and print postage. The power button will flash while the device is printing. The word “Redate” appears on the newly printed postage mark on the back of the envelope.
You may print a prepaid return envelope, card, or label on your franking machine. This will allow the recipient to return an item without cost to themselves. Follow the steps below to print a prepaid return envelope.
1. (Optional) If accounting is enabled, tap “Cost Account” to select an account, or leave the default account selected.
2. Tap the arrows at the top of the display to scroll and tap “Custom Job”.
3. Tap the down arrow to scroll and tap “Pre-pay Reply for second class” or “Pre-pay reply for First class” as appropriate.
4. Tap “Letter” or “Large Letter” and you will be returned to the Home screen. Your chosen pre-pay class will display in the top ribbon.
5. Insert the envelope or tape into the device, pushing in all the way to the back and right. The device will clamp the mail piece and print postage. The power button will flash while the device is printing.
6. When the device finishes printing, remove the letter. Do not pull the letter out of the machine while the power button is flashing.
You can view and export a report of your postal transaction history directly from your Online Postage account. To view and print your reports, go to your Online Postage Account on a computer.
Issue
The device displays the message “Unable to print stamp” when you try to print postage.
Cause
The contract associated with the device is no longer active.
Solution 1: Restart the device
1. Disconnect the USB scale.
2. Hold the power button until the screen displays “Shutting Down”.
3. Once off wait 5 seconds.
4. Tap the power button.
Solution 2: Perform a hard restart
1. Disconnect the power cord from the back of the machine.
2. Wait ten seconds.
3. Plug the cord back in firmly.
4. Tap the power button.
If the issue is resolved, reconnect the USB scale.
Issue
The device displays the “Printer temperature high” message along with a rapidly flashing blue power light.
Cause
The lift motor is too hot. Do not print more than 300 stamps at a time, because exceeding this amount may cause the lift motor to overheat.
Solution 1: Wait for cool down
Allow the device to cool down for two hours by not printing anything and letting it sit idle. Do not power off the device or leave the ink door open during the cool-down period.
Solution 2: Physically disconnect and reconnect the device
1. Disconnect the power cord from the back of the machine.
2. Wait ten seconds.
3. Plug the cord back in firmly.
4. Tap the power button.